Christina Najjar

  • About
  • Work With Me
  • Articles & Tips
  • Recipes
    • Breakfast
    • Mains
    • Sides
    • Snacks
    • Goodies
    • Beverages
    • Paleo/Grain-Free
    • Vegan
  • Contact

Make Your Own Coconut Milk (paleo, vegan, sugar free)

August 8, 2013 by Christina Najjar 4 Comments

If, like me, you go through tons of coconut milk, it may be advantageous for you to start making your own. First of all, it’s more economical. I can make it for $1 (or less) using coconut shavings, or I can buy it for $3.29 in Ottawa. Additionally, making your own is healthier. You get to control what goes into your milk; no weird binding agents or preservatives.

I’ve also been trying to be more conscious of reducing my waste. I could easily go through 2 tetra packs of coconut milk per week. That waste accumulates really quickly! I would much rather use and reuse my mason jars.

Coconut milk you can make at home

Make Your Own Coconut Milk (paleo, vegan, sugar free)

What you need
1 cup shredded coconut
3 cups boiling water
Blender
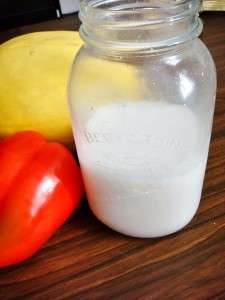
4 cup (1L) mason jar
Funnel
Fine mesh strainer or nut milk bag

What you do
Combine the boiling water and the shredded coconut in the blender. LET IT COOL DOWN. I didn’t wait, and I ended up burning myself. Because of the higher temperature, more pressure is required on the blender lid to stop it from overflowing. Avoid accidents by letting it cool down.

Once cooled down, blend for a few minutes. You won’t be able to get rid of all the coconut pieces so blend it until it’s to your desired thickness. Then, if you’re using a strainer, place your funnel in the jar mouth and the strainer on top of the funnel, and pour the coconut milk. If you’re using the nut milk bag, place it in a bowl and pour the coconut through the bag.

You can add a bit of vanilla and a liquid sweetener for taste, but it’s not necessary, if you want to skip that step.

Refrigerate for up to 5 days. A solid block of fat will form at the top. This can be blended in smoothies or heated to melt.

Filed Under: Beverages, Make Your Own, Paleo/Grain-Free, Vegan Tagged With: breakfast, candida, corn free, dairy free, egg free, gluten free, grain free, healthy fats, nut free, soy free, sugar free, vegan

Comments

  1. Anonymous says

    August 9, 2013 at 10:06 pm

    Your blog makes me happy!

    Reply
  2. Christina Najjar says

    August 10, 2013 at 3:25 pm

    Aww thank you! Your comment makes me happy 🙂

    Reply
  3. Anonymous says

    September 6, 2013 at 8:36 pm

    Does a regular blender work or do you need a special kind? Would a coffee filter work as a strainer?

    Reply
  4. Christina Najjar says

    September 8, 2013 at 12:08 am

    A regular blender works, but depending on your blender, you may need to take blending breaks to not burn out the motor.

    Reply

Leave a Reply Cancel reply

Your email address will not be published. Required fields are marked *

Recent posts

  • Healthier Beverage Options to Stick to Your Health Goals
  • 5 No-Cook Meals to Make on a Hot Summer Day
  • Nutrition: The Missing Piece for Fibromyalgia and Chronic Fatigue Syndrome?
  • My Endometriosis Journey and the Underdiagnosis of Menstrual Issues
  • 7 Ways to Reduce Your Exposure to Hormone Disruptors

I believe eating well and making good lifestyle choices should be easy. I know life gets in the way sometimes. I'm here to help. Learn More

Latest

Christina Najjar - Natural Nutrition

Follow me

  • Facebook
  • Instagram
  • Pinterest
  • Twitter

Get in touch

Find me at:

2122B Montreal Rd
Ottawa ON K1J 6M7
T: (613) 706-2811

Or send me a message

Copyright © 2021 Christina Najjar · All Rights Reserved ·